Screen Settings on Windows Pc
Developed By: Forbitel
License: Free
Rating: 3,2/5 - 75 votes
Last Updated: February 26, 2025
App Details
| Version |
2.00 |
| Size |
1 MB |
| Release Date |
December 04, 14 |
| Category |
Tools Apps |
|
What's New:
v2.00:- Material Design User Interface (Lollipop)- NEW TOUCHLESS PROFILE that requires NO REBOOT!, activated by default on new installations. On existing... [see more]
|
|
Description from Developer:
REQUIRED:
Device: Screen larger than 3.5"
OS: 4.2, 4.3, 4.4, 5.0
ROOT: ROOT Access
Keyboard: Google Keyboard recommended (free on Google Play), others might not adjus... [read more]
|
About this app
On this page you can download Screen Settings and install on Windows PC. Screen Settings is free Tools app, developed by Forbitel. Latest version of Screen Settings is 2.00, was released on 2014-12-04 (updated on 2025-02-26). Estimated number of the downloads is more than 1,000. Overall rating of Screen Settings is 3,2. Generally most of the top apps on Android Store have rating of 4+. This app had been rated by 75 users, 23 users had rated it 5*, 29 users had rated it 1*.
How to install Screen Settings on Windows?
Instruction on how to install Screen Settings on Windows 10 Windows 11 PC & Laptop
In this post, I am going to show you how to install Screen Settings on Windows PC by using Android App Player such as BlueStacks, LDPlayer, Nox, KOPlayer, ...
Before you start, you will need to download the APK/XAPK installer file, you can find download button on top of this page. Save it to easy-to-find location.
[Note] You can also download older versions of this app on bottom of this page.
Below you will find a detailed step-by-step guide, but I want to give you a fast overview of how it works. All you need is an emulator that will emulate an Android device on your Windows PC and then you can install applications and use it - you see you're playing it on Android, but this runs not on a smartphone or tablet, it runs on a PC.
If this doesn't work on your PC, or you cannot install, comment here and we will help you!
Step By Step Guide To Install Screen Settings using BlueStacks
- Download and Install BlueStacks at: https://www.bluestacks.com. The installation procedure is quite simple. After successful installation, open the Bluestacks emulator. It may take some time to load the Bluestacks app initially. Once it is opened, you should be able to see the Home screen of Bluestacks.
- Open the APK/XAPK file: Double-click the APK/XAPK file to launch BlueStacks and install the application. If your APK/XAPK file doesn't automatically open BlueStacks, right-click on it and select Open with... Browse to the BlueStacks. You can also drag-and-drop the APK/XAPK file onto the BlueStacks home screen
- Once installed, click "Screen Settings" icon on the home screen to start using, it'll work like a charm :D
[Note 1] For better performance and compatibility, choose BlueStacks 5 Nougat 64-bit read more
[Note 2] about Bluetooth: At the moment, support for Bluetooth is not available on BlueStacks. Hence, apps that require control of Bluetooth may not work on BlueStacks.
How to install Screen Settings on Windows PC using NoxPlayer
- Download & Install NoxPlayer at: https://www.bignox.com. The installation is easy to carry out.
- Drag the APK/XAPK file to the NoxPlayer interface and drop it to install
- The installation process will take place quickly. After successful installation, you can find "Screen Settings" on the home screen of NoxPlayer, just click to open it.
Discussion
(*) is required
REQUIRED:
Device: Screen larger than 3.5"
OS: 4.2, 4.3, 4.4, 5.0
ROOT: ROOT Access
Keyboard: Google Keyboard recommended (free on Google Play), others might not adjust dynamically to changes in resolution
Samsung devices with multi window such as the new note 10.1 2014, and note 3: Samsung is using a custom made window manager that at the moment is not compatible with changes to the device resolution.
What does this app do?
It allows to change the resolution and the pixels density of your device
Why is this useful?
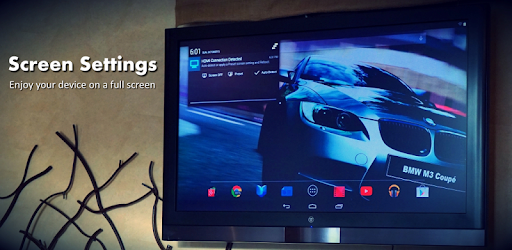
Watching Video using the hdmi output will usually mirror the screen content without correcting for aspect ratio, by setting the correct resolution and pixel density of the screen to match the tv allows to fill the entire external screen and avoid side black bars.
Playing games on an external tv: normally, the device will render the games to the full resolution available on the device's screen. On the case of the Nexus 10, games will be rendered to its huge resolution of 2560x1600 and then it will be scaled down to the tv screen resolution wasting GPU processing power and resulting on more heat and power consumption during gaming. By reducing the screen resolution to match the external monitor/tv less processing power is needed to render the game at the lower tv's resolution, many games will even use the extra processing power available for more effects or more frames per second.
For developers to simulate other screen resolutions and pixel density for android developers to test their applications on the physical device and observe how their application will look on other devices.
Available Options:
Manual Settings: Allows to manually select the desired resolution and pixel density according to pre-defined standard aspect ratios.
Auto Detection: Will run in the background and will detect HDMI connections and disconnections. On a HDMI connection detected, a notification will be presented to apply the detected screen resolution and pixel density appropriate for your screen. On a HDMI disconnection, the notification will allow to return to the device's default settings.
Reboot Mode: New Soft Reboot will only reboot the graphical interface not the entire system (Fast). Normal Full Reboot (safest, use if you find interface issues with the Soft Reboot).
Screen Size: Define your screen size (affects dpi calculation).This setting comes pre-defined for the nexus 10, but for other devices you should change it to match your screen size.
HDMI Resolution Preset: Define your preferred output resolution instead of using the Auto-Detection option.
Default Settings: reset to the factory configuration.
Auto DPI Selection it will select the appropriate dpi value for the selected resolution and the screen size defined on the settings.
Screen OFF feature: (experimental, tested to be working on nexus 10): allows you turn your device's screen off while keeping the output to the hdmi to reduce the power usage. To turn the screen back ON just press the power button twice or simply disconnect the hdmi.
New Recovery Feature: Recovers the default screen setting in case the device did not support the resolution applied. To trigger the recovery feature, plug and unplug the power/charger to the device allowing ~1s between plug/unplug as many times as defined on the settings menu, default is 3 times.
Why a reboot is needed to apply the new screen settings?
For now the safest way to restore the entire Interface with the new resolution and pixel density is to reboot the system. The new Soft Reboot should reduce considerably the time required to reset the interface.
v2.00:
- Material Design User Interface (Lollipop)
- NEW TOUCHLESS PROFILE that requires NO REBOOT!, activated by default on new installations. On existing installations can be turned ON at Setup > Touchless Profile (turn ON), and select Resolution Mode> "Use Auto-Detected Aspect Ratio" then plug the HDMI connector.
- Compatibility with Android v5.0 (Lollipop).
- BusyBox is no longer required.
- The "Screen" button will now switch the screen ON and OFF.
- Faded Screen ON/OFF transition.