8-Bit RPG Creator on Windows Pc
Developed By: Scott Cawthon
License: Free
Rating: 4,0/5 - 13.662 votes
Last Updated: April 03, 2025
Game Details
| Version |
1.53 |
| Size |
36.6 MB |
| Release Date |
April 14, 14 |
| Category |
Role Playing Games |
|
What's New:
new features [see more]
|
|
Description from Developer:
Snap together your own classic rpg within minutes! Put together your own enemies and NPC's using 200 body parts and over 1 BILLION possible character combinations! Build your o... [read more]
|
About this game
On this page you can download 8-Bit RPG Creator and play on Windows PC. 8-Bit RPG Creator is free Role Playing game, developed by Scott Cawthon. Latest version of 8-Bit RPG Creator is 1.53, was released on 2014-04-14 (updated on 2025-04-03). Estimated number of the downloads is more than 100,000. Overall rating of 8-Bit RPG Creator is 4,0. Generally most of the top apps on Android Store have rating of 4+. This game had been rated by 13,662 users, 1 users had rated it 5*, 1 users had rated it 1*.
How to play 8-Bit RPG Creator on Windows?
Instruction on how to play 8-Bit RPG Creator on Windows 10 Windows 11 PC & Laptop
In this post, I am going to show you how to install 8-Bit RPG Creator on Windows PC by using Android App Player such as BlueStacks, LDPlayer, Nox, KOPlayer, ...
Before you start, you will need to download the APK/XAPK installer file, you can find download button on top of this page. Save it to easy-to-find location.
[Note] You can also download older versions of this game on bottom of this page.
Below you will find a detailed step-by-step guide, but I want to give you a fast overview of how it works. All you need is an emulator that will emulate an Android device on your Windows PC and then you can install applications and use it - you see you're playing it on Android, but this runs not on a smartphone or tablet, it runs on a PC.
If this doesn't work on your PC, or you cannot install, comment here and we will help you!
Step By Step Guide To Play 8-Bit RPG Creator using BlueStacks
- Download and Install BlueStacks at: https://www.bluestacks.com. The installation procedure is quite simple. After successful installation, open the Bluestacks emulator. It may take some time to load the Bluestacks app initially. Once it is opened, you should be able to see the Home screen of Bluestacks.
- Open the APK/XAPK file: Double-click the APK/XAPK file to launch BlueStacks and install the application. If your APK/XAPK file doesn't automatically open BlueStacks, right-click on it and select Open with... Browse to the BlueStacks. You can also drag-and-drop the APK/XAPK file onto the BlueStacks home screen
- Once installed, click "8-Bit RPG Creator" icon on the home screen to start playing, it'll work like a charm :D
[Note 1] For better performance and compatibility, choose BlueStacks 5 Nougat 64-bit read more
[Note 2] about Bluetooth: At the moment, support for Bluetooth is not available on BlueStacks. Hence, apps that require control of Bluetooth may not work on BlueStacks.
How to play 8-Bit RPG Creator on Windows PC using NoxPlayer
- Download & Install NoxPlayer at: https://www.bignox.com. The installation is easy to carry out.
- Drag the APK/XAPK file to the NoxPlayer interface and drop it to install
- The installation process will take place quickly. After successful installation, you can find "8-Bit RPG Creator" on the home screen of NoxPlayer, just click to open it.
Discussion
(*) is required
Snap together your own classic rpg within minutes! Put together your own enemies and NPC's using 200 body parts and over 1 BILLION possible character combinations! Build your own customized weapons and weapon shops; draw your own overworld maps using tiles for grass, snow, sand, stone and lava; and interlink as many overworld maps as you want for almost unlimited gameplay possibilities!
(NOTE: This program is for entertainment purposes only and is not for professional game development.)
Highlights include:
-Make unlimited games!
-Switch between edit and play modes at the click of a button!
-Go back and tweak enemies and maps in seconds!
-50 character and weapon slots per game!
-Choose between 12 unique heroes!
Start by clicking an empty game slot that says "empty". You will then be prompted to name your game. Be sure to name your game using letters, numbers, and spaces only! Not giving your game a proper name will prevent it from saving properly!
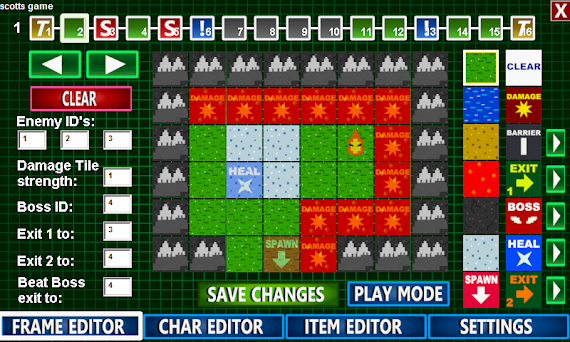
The Frame Editor:
The games you make will consist of frames; each frame can be one of four things, a title, an overworld, a shop, or a cinematic. The game will always start on frame 1, but from there, frames do not have to play in sequence. Each frame will have options to set where a player will go when leaving the frame. To create a new frame, click the "empty" grey frames along the top of the level editor screen. Then pick what type of frame you will create from the menu. Here are the types of frames:
Title- Use this at the beginning of your game (best at frame 1), or to divide your game into chapters. A title will consist of a simple text title at the center of the screen, and can contain save/load options if you prefer.
Overworld- This is the overworld map. You can have as many of these as you like and link them together through exits to make the world as large as you wish. Each overworld can have three total exits, two labeled as "exit 1" and "exit 2" which can lead to shops or other frames, and the third exit, which is where the player will go after defeating a boss. Set these options on the left hand side of the overworld menu so the game will know where these exits will lead. Here you can also enter enemy ID numbers so the game will know what enemies the player will encounter on this map, as well as the boss ID. Character ID's are displayed at the top of the character creation page.
Each overworld map has two layers. The first layer is it's base color, and can look like grass, snow, sand, etc. The player can walk on all of these freely. The second layer determines what is an obstacle, what causes damage, what heals, etc. Draw the base layer using the first row of tiles next to the map grid. Then use the second layer to set boss locations, exit locations, healing tiles, etc. Boss locations, obstacles, healing tiles and exits can look like different things. Click the green arrows next to these tiles to change their appearance on the map.
Shop- This frame consists of a shopkeeper, which you will pick from you list of created characters, as well as a selection of three weapons. Enter the text for the shopkeeper, as well as the item ID numbers and prices of the three weapons you wish you sell in this shop.
Cinematic- A cinematic consists of a character, which you will pick from your list of created characters, and some dialog. After the player reads it, they will click the "next" button to proceed to the next desired frame.
new features